Griffith Park Yarnscape 3: How to Crochet a Butterfly

Posted on:

Topics: DIY, Exhibitions

Have you had enough passive screen-time and want to make something with your hands, maybe learning a new skill in the process? Join us in contributing to a gallery display of Griffith Park in crochet, with the help of these how-to videos.   

As part of our exhibition Investigating Griffith Park we’re inviting the Autry community to make pieces to represent various aspects of the park, from nature to recreational activities, and mail them into the Autry (or drop them off in person once the museum re-opens, if you prefer). We’ll then add your art to the gallery, around a crocheted Griffith Park sign, to capture the essence of the park and create a post-pandemic community display.  

This week’s video shows you how to make a butterfly, with a design based on the colors and wing pattern of a Sulphur Butterfly, many of which have been historically and currently identified in the park. If you want to try making different butterfly species, here is a field guide to common Griffith Park butterflies, from the Friends of Griffith Park.

You don’t need experience with crochet, as instructor Julie Kadoi walks you through the basic stitches, and for those more comfortable with working from written instructions we have included the pattern below. So, pick up those hooks and yarn, make a butterfly (or maybe a leafy daisy or kite from previous videos), and look for future videos in the coming weeks.  
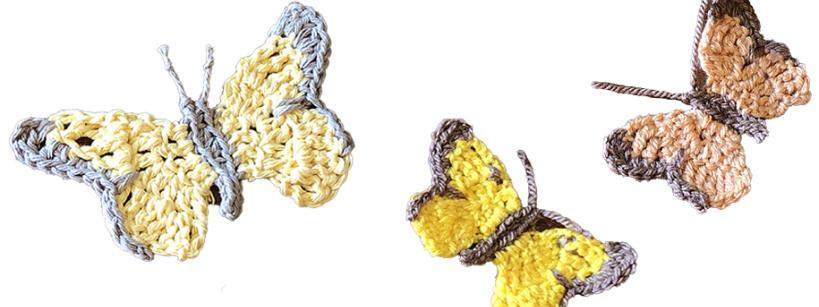
Yarnscape 3: How to Crochet a Butterfly

Griffith Park Yarnscape 3: How to Crochet a Butterfly

Download Directions as PDF File 

MATERIALS

  • DK-weight (#3) yarn in yellow/white and tan/grey/brown
  • 3.5mm (E) crochet hook
  • Tapestry needle
  • Scissors

Glossary of terms & abbreviations: 

  • chain stitch (ch): To make, draw yarn through the active loop on the hook. 
  • fasten off: cut the yarn 3 to 4 inches from the last stitch and draw the end through the active loop. Pull tightly to secure.  
  • double crochet stitch (dc): To make, yarn over, insert hook into indicated stitch, draw up a loop, (there will be three loops on the hook) yarn over and draw through two loops, yarn over and draw through two loops again.
  • double-treble crochet stitch (dtc): To make, yarn over three times, insert hook in indicated stitch, draw up a loop (there will be 5 loops on the hook), yarn over and draw through 2 loops four times.
  • front loop only (FLO): Indicates the location of where to place a stitch. Out of the two loops in the top of a stitch, only work under the one which is closest to the crocheter.
  • half-double crochet stitch (hdc): To make, yarn over, insert hook into indicated stitch, draw up a loop, (there should be three loops on the hook) yarn over and draw through all three loops.
  • long single crochet (spike stitch): To make, insert hook into the indicated location in a previous row, draw up a long loop (back up to the current row), yarn over and draw through both loops.
  • single crochet stitch (sc): To make, insert your hook into the indicated stitch, draw up a loop, yarn over and draw through both loops.  
  • skip (sk): helps to identify where the next stitch goes by accounting for any stitches in the row below that will not be worked in.
  • slip knot: To make, cross the tail end over the yarn to make a loop, draw up yarn from the yarn ball side through the loop and tighten, making sure the cut end is not pulled through.
  • slip stitch (sl st): To make, insert your hook into the indicated stitch, draw up a loop, draw the top loop on the hook through the bottom loop.  
  • stitch (st): a generic stitch, usually designates the location in the previous row in which a particular stitch, such as a single crochet, will be made.  
  • tail: the unworked cut end of the yarn.
  • treble crochet stitch (tc): To make, yarn over twice, insert the hook into the designated stitch, draw up a loop, yarn over and draw through two loops three times.
  • weave in the ends: using a tapestry needle, draw the yarn end through several stitches on the back side of work, skip one strand of yarn and pull the end through the opposite way, skip another strand and pull the end the opposite way again to lock in place.

PATTERN NOTES:

Body is made first. The wings are worked onto the sides of the body, one at a time. Front side and back side are used here (instead of the usual terms right side and wrong side) to indicated which side of the piece will be worked. Wings may be embroidered at the end however you like.


PATTERN

Body

  • Using tan yarn, Chain (ch) 10.
  • ROW 1: Sk 1 ch, sl st in next 3 ch, sc in next 2 ch, hdc in next 2 ch, sc in next ch, sl st in last ch. Cut yarn leaving short tail to represent antenna, fasten off. Tie a knot in each antenna. Fasten off. Turn.

Right wing

  • ROW 1: Back side. Work all stitches in this row in the front loop only (FLO). Using yellow yarn, draw loop of yarn through the FLO of last sc made on body, ch 2, dc in FLO of next 3 st, hdc in FLO of next st. Turn.
  • ROW 2: Front side. Ch 3 (counts as a dc), dc in 1st st, 2 dc in next 3 st, dc in 2nd ch of ch 2. Turn.
  • ROW 3: Back side. Ch 4, dtr in next st, tc in next st, dc in next st, sl st in row below between the posts of  the 4th and 5th st, ch 3, sk usual place where st is placed,  dc in next st, 2 tc in next st, 2 dc in next st. Ch2, sl st in top of ch-3. Fasten off. Turn.
  • ROW 4: Front side. Using tan yarn, draw up a loop in 2nd to last dc from last row. Ch 1, sl st in next 3 st, sl st in top ch of ch-3, long sc over sl st from last row, sc in next st, 2 sc in next tc, 2 hdc in next dtrc, (dc, ch 2, sl st) in top of ch-4.

Left wing

  • ROW 1: Back side. Work all stitches in this row in FLO. Using yellow yarn, draw a loop of yarn through the front loop only (FLO) of 6th ch made on body (count down from the antenna), ch 2, dc in next 3 st, hdc in next st. Turn.
  • ROW 2: Front side. Ch 3. 2 dc in next 3, 2 dc in 2nd ch of ch-2. Turn.
  • ROW 3: Back side. Ch 3, 2 dc in next st, 2 tc in next st, dc in next st, ch 3, sl st in row below between the posts of the 5th and 6th st, dc in next st, tc in next st, dtr in next st, (ch 4, sl st) top of ch-3. Fasten off.
  • ROW 4: Front side. Using brown yarn, draw up loop in the top ch of ch-4 just made and ch 3, dc in same st, 2 hdc in next st, 2 sc in next st, long sc over the sl st from last row, sl st in top ch of ch-3, sl st in next 3 st. Fasten off.
  • Weave in ends. Embroider wings as desired with spots or other markings. Pull the top wings outward horizontally and tug on stitches to shape in order to reduce any holes in the wings and to prepare the  butterfly for flight!

Mailing Submissions 

Please mail your Butterfly submissions to:  

YARNSCAPE AT THE AUTRY 
Autry Museum of the American West 
4700 Western Heritage Way 
Los Angeles CA 90027 

If you prefer you may drop them off when the Autry reopens to the public. 

Land Acknowledgment

The Autry Museum of the American West acknowledges the Gabrielino/Tongva peoples as the traditional land caretakers of Tovaangar (the Los Angeles basin and So. Channel Islands). We recognize that the Autry Museum and its campuses are located on the traditional lands of Gabrielino/Tongva peoples and we pay our respects to the Honuukvetam (Ancestors), ‘Ahiihirom (Elders) and ‘Eyoohiinkem (our relatives/relations) past, present and emerging.

The Autry Museum in Griffith Park

4700 Western Heritage Way

Los Angeles, CA 90027-1462
Located northeast of downtown, across from the Los Angeles Zoo.
Map and Directions

Free parking for Autry visitors.


MUSEUM AND STORE HOURS
Tuesday–Friday 10:00 a.m.–4:00 p.m.
Saturday–Sunday 10:00 a.m.–5:00 p.m.

DINING
Food Trucks are available on select days, contact us for details at 323.495.4252.
The cafe is temporarily closed until further notice.